Sample pdf with sidebar index.
wkgtk-html2pdf is a powerful and easy-to-use API for converting HTML content into high-quality PDF documents using WebKitGTK. Developed as a modern alternative to legacy tools like wkhtmltopdf—which has been archived since 2023—this project fills the gap for reliable, up-to-date HTML-to-PDF conversion. It provides a clean, intuitive C++ API that simplifies HTML generation by eliminating the need for string literals and explicit closing tags, making it ideal for embedding in applications. The tool supports advanced features such as internal anchors, links, and nested sidebar indexing, enabling the creation of structured, navigable PDFs. A simple command-line interface is also available for quick, one-off conversions. With its focus on maintainability and modern development practices, wkgtk-html2pdf is designed to be a reliable choice for developers seeking a dependable solution for PDF generation.
This project is entirely inspired by wkhtmltopdf as when we were searching for a replacement we simply could not find one, and even the paid for options seemed overly complex where they needn't be and severely lacking where they should. We have tried to iron out some of the issues we have encountered along the way and have produced this manual to assist with those unavoidable issues that must be worked around. We hope that you find this project useful and we would be very much appreciative of any contribution, be that funding, documentation, testing, or design.
wkgtk-html2pdf includes a set of built-in, pre-configured CSS templates for all standard ISO and US paper sizes, ensuring compatibility and consistency across different regions and use cases. These templates are designed to prevent the generation of extraneous blank pages by precisely defining page dimensions, margins, and layout constraints using CSS custom properties.
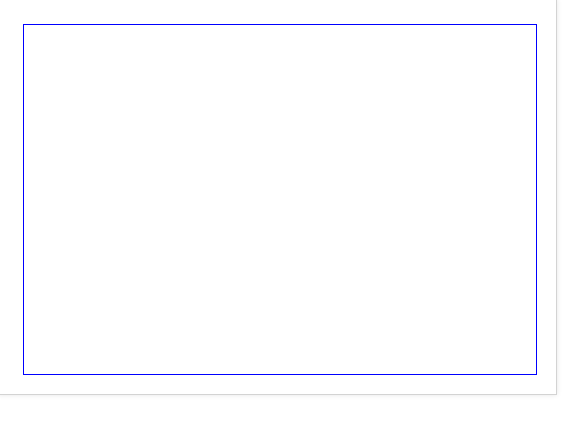
Each template uses a clean, modular structure with variables for page width, height, and margin, allowing for easy customization while maintaining reliable output. A lightweight JavaScript utility is included to monitor content overflow in real time—when content exceeds the available space, the subpage border turns red; when it fits perfectly, the border turns green. This visual feedback helps you quickly identify and resolve layout issues before conversion.
The templates also include print-specific CSS rules that ensure clean, artefact-free output when the HTML is rendered to PDF, while maintaining visual guides during development for easier debugging and refinement.
In wkgtk-html2pdf we have endeavoured to create a system that does not require you to learn additional languages; all you should need is a reasonable understanding of HTML.
This manual is a self fulfilling prophecy as it is developed entirely using wkgtk-html2pdf so the layout the code that is used to write it is in itself a tutorial. If you are uncertain about how something is done then is worth reviewing the HTML and CSS used to generate it.
Unlike many wrapper libraries that expose internal dependencies to the host application, wkgtk-html2pdf is engineered with a strict Binary Interface (ABI). We utilize the Pimpl (Pointer to Implementation) idiom throughout the C++ API to create a "firewall" between the library's internal logic and your application. This tedious but essential design choice provides several critical benefits:
The CLI is the simplest way to get started with wkgtk-html2pdf. It allows you to convert HTML files into PDFs with minimal setup.
To generate a PDF using the default settings use the following command:
html2pdf -i input.html -o output.pdfThe following options are available for the cli.
| Option | Description |
|---|---|
| -h, --help | Display the help message with all available options. |
| -v, --verbose | Set the log level (1-7), with higher values providing more detailed output. Logs are written to the system journal. |
| -i, --infile | Specify the source HTML file to convert. |
| -o, --outfile | Specify the output PDF file name. |
| -O, --orientation | Set page orientation: portrait or landscape. |
| -s, --size | Set the page size (Default A4) |
| - ISO (A): A0, A1, A2, A3, A4, A5, A6, A7, A8, A9, A10 | |
| - ISO (B): B0, B1, B2, B3, B4, B5, B6, B7, B8, B9, B10 | |
| - ISO (C): C0, C1, C2, C3, C4, C5, C6, C7, C8, C9, C10 | |
| - US: Letter, Legal, Tabloid | |
| - ANSI: ANSIA, ANSIB, ANSIC, ANSID, ANSIE | |
| - Architectural: ArchA, ArchB, ArchC, ArchD, ArchE | |
| - Other: SRA0, SRA1, SRA2, SRA3, SRA4 | |
| --index | Create anchor points for indexing: classic or enhanced for nested sidebar indexing. |
| -r --relative-uri | look for resources such as images in, or relative to, the current working folder. |
To generate a clean, professional PDF, you must optimize your HTML to ensure it aligns with the desired page size and layout. The output is entirely governed by the CSS and HTML structure, so the quality of the final PDF depends on how well your content is designed.
<link rel="stylesheet" href="/usr/share/wk2gtkpdf/A4-portrait.css"><div class="page">
<div class="subpage">
<!-- Your page content here -->
</div>
</div>This script provides real-time feedback, helping you identify and fix layout issues before conversion.
<script src="/usr/share/wk2gtkpdf/overflow-monitor.js><script>By designing your HTML and CSS carefully, you have full control over the final PDF output. Avoid common issues: Mismatched stylesheets, incorrect classes, or content overflow can lead to blank pages, cut-off content, or incorrect scaling.
The overflow detection script helps you identify and fix layout issues before conversion.
Below is a minimal, single-page example utilizing the built-in overflow monitor and missing-font detector.
<!DOCTYPE html>
<html>
<head>
    <link rel="stylesheet" href="/usr/share/wk2gtkpdf/A4-portrait.css">
</head>
<body>
    <div class="page">
        <div class="subpage">
            <h1>My Document</h1>
            <p>This content will be rendered in A4 portrait format.</p>
        </div>
    </div>
</body>
<script src="/usr/share/wk2gtkpdf/overflow-monitor.js><script>
</html>
Each declaration of a .page and .subpage container will create a new page. Blank pages can also be inserted by declaring a .page and .subpage container.
wkgtk-html2pdf offers two indexing modes to generate the PDF sidebar navigation: Classic and Enhanced.
In Classic mode, the engine automatically scrapes all internal anchors (any <a> tag where the href starts with #) and includes them in the PDF index. This is ideal for simple documents where every link is a significant navigation point.
<!-- Automatically indexed in Classic Mode -->
<li><a href="#reference">Reference</a></li>
<p><a href="#section1">Section 1</a></p>
<div><a href="#appendix">Appendix</a></div>Enhanced mode (--index enhanced) is a professional-grade feature that allows for selective indexing. Only elements explicitly marked with the index-item class,class will appear in the PDF sidebar. This prevents "index noise" in documents with many internal cross-references.
<!-- This will be included -->
<li class="index-item">
    <a href="#reference">
        <span>Reference</span>
        <span>A1</span>
    </a>
</li>

<!-- This will be ignored -->
<p><a href="#section1">Section 1</a></p>

<!-- This will be included (container type doesn't matter) -->
<div class="index-item">
    <a href="#appendix">Appendix</a>
</div>In this example only the first and third elements will be included in the index. While this feature may not be essential for most users, it could be useful in specific scenarios where you want to:
The benefits of enhanced mode will become more clear after you read the section on sidebar indexing below.
Save for the styling the difference is
<li class="index-item"> <a href="#ref"> <span> Enhanced mode </span> <span> 4.1 </span> </a> </li><li> <a href="#ref"> <span> Enhanced mode </span> <span> 4.1 </span> </a> </li>As you can see from the code, theoretically the link should work across the entire line, even in classic mode but it doesn't (even in HTML). Ordinarily when you convert your link to a you lose right right hand side part of the anchor unless you enable enhanced mode
Most users familiar with PDF technical manuals rely heavily on the sidebar index (bookmarks). This navigation tree remains on-screen at all times, making it more practical than a traditional printed index page. Regardless of whether you choose Classic or Enhanced mode, wkgtk-html2pdf automatically builds a nested, hierarchical sidebar by analyzing your HTML structure.
For an item to appear in the PDF sidebar index, it must satisfy two conditions:
<a href=#setup_guide>Go to Setup</a>
<h2 id=setup_guide>1.1 System Setup</h2>The engine will parse "1.1" and automatically nest this bookmark under "1.0" in the PDF sidebar.
Aside from selective filtering, Enhanced Mode offers a significant UX advantage regarding the "Clickable Area."
In standard HTML, an anchor often wraps only the text, leaving the rest of the line (such as the page number or dot leaders) unclickable. Enhanced Mode expands the interactive hit-box to include the entire .index-item container. This ensures that in the final PDF, the user can click anywhere on the index line—not just the text—to jump to the section.
Below is a live example which may or may not appear in the index depending on whether you create the PDF using enhanced index mode or classic.
1.1 I am here
The link has been explicitly disabled when the manual is compiled with indexing in enhanced mode to further demonstrate why this might be useful. You will note that if you compile this manual in classic mode you will actually see the link in the sidebar nested in section 1. Were we not demonstrating how this works that behaviour would be undesirable but we can disable it in advanced mode without causing problems for the rest of the document.
If you wanted to enable the link in enhanced mode then it is as simple as wrapping the anchor in an element with the a class of "index-item".
<span class="index-item"><a href="#enhanced-anchor" >Take me to your linker</a></span>;
<p id="enhanced-anchor">4.3.1 Enhanced indexing anchor demo</p>Enhanced mode links work in both classic and enhanced mode.
4.3.1 Enhanced indexing anchor demo
The above link will appear in the index. This time you will note that we have explicitly numbered the link 4.3.1 so that it will appear nested in section 4.3 within the index.
If you do have an index page then attaching it to the sidebar is as simple as declaring toc within the page element.
<div class="page toc">
    <div class="subpage">
        <!-- Your page content here -->
    </div>
</div>The table of contents should be declared exactly once per document.
NOTE:If it is declared more than once the the first declaration that wkgtk-html2pdf finds will be used and the rest will be ignored.
When you declare a Table of Contents/Index page it will be attached to the top level "Contents" bookmark within the index.
If your document contains images then you have a number of options. The first is if they are served from a URL then they will just work without straight out of the box.
As this is a semi interactive manual if you are viewing this in html you should see a random image generated. This image will be embedded in the PDF upon generation.
Both static and relative paths also work however if you are using relative paths then the images must be contained within the working directory and you must use the -r flag on the cli (no argument need be specified). Full paths are also supported.

Base64 encoded images also work work should you wish to embed them directly in your HTML.
Special attention is required when working with fonts, as missing fonts can cause overflow and unexpected results; especially when the fallback font differs significantly from the intended font.
Within our suite we have included a JavaScript snippet that if enabled should detect missing fonts and warn you before you generate your PDF. As long as wkgtk-html2pdf can see the font it should render the page correctly.
When converting or generating HTML that works seamlessly as a PDF there are several issues that may lead to unexpected results. While not an exhaustive list the following are most common:
In an attempt to combat these problems that plague HTML to PDF conversion we have incorporated a small JavaScript helper that works alongside our CSS stylesheets to try help combat these problems.
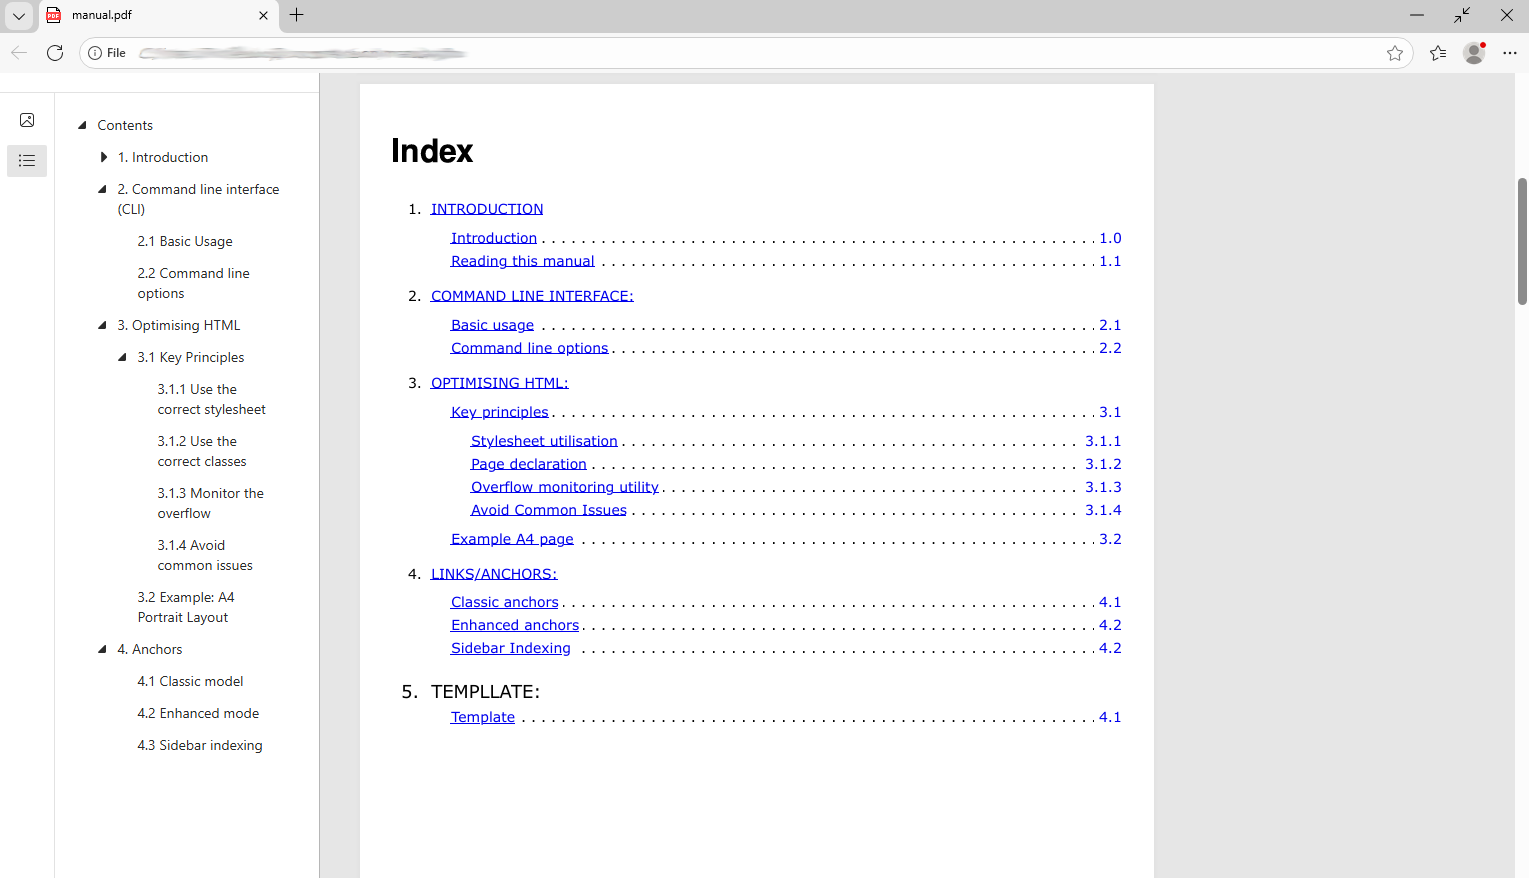
When you include the appropriate template for your desired page size and declare a .page and .subpage <div> element. You will note that you now have something on screen that represents the page size of the PDF you are developing. This will include a margin outlined in blue.
All of the page templates are located in
/usr/share/wk2gtkpdf/templates
If you wish to change one of the page margins then it is simply a matter of editing the appropriate stylesheet by changing --page-margin value as needed.
NOTE: The margin is measured in millimetres(mm).
:root {
    --page-width: 210;
    --page-height: 297;
    --page-margin: 8;
}These stylesheets contain calculations that ensure there are no extra blank pages when the PDF is generated. They also provide you with a visual representation of a page including its margins.
As long as you keep your content within the subpage element it should stay within the margins and on the provision that the font is accessible and given the appropriate arguments it should render identically with the command line interface.
As aluded to several times throughout this manual wk2gtk-html2pdf includes a helper utility to aid with design. It is located in the same folder as the CSS templates and can be used to identify problems before trying to generate a PDF.
To use the utility you need to declare it:
<script src=""/usr/share/wk2gtkpdf/overflow-monitor.js"><script>Once declared it will automatically monitor changes in the background and warn of any detected Issues in a panel which will appear towards the bottom left corner of the your preview.
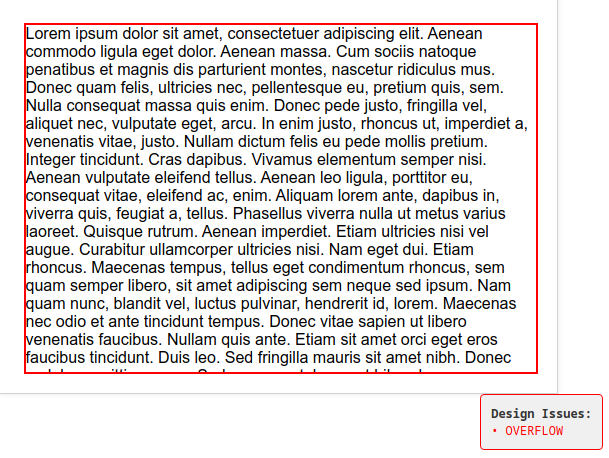
In addition to the detection of overflow it should also be capable of detecting missing fonts. This is to be considered advisory and if there are rendering issues the first thing that should be checked is the system wide availability of fonts.
NOTE: Font detection has been checked in most cases however it should be noted that due the manner in which detection is achieved is should not be considered reliable in 100 percent of cases.
You will note that the pages within this document are all numbered. That is an automatic feature that we do using CSS and it is done utilising CSS' built in counter function:
div.subpage:after {
     content: " Page - " counter(page);
     position: absolute;
     bottom: 0px;
     right: 0px;
     z-index: 999;
     padding: 2px 8px;
     border-right: 2px solid #23b8e7;
     font-size: 12px;
 }
Apart from some basic styling this is relatively simple as all that is needed is
content: " Page - " counter(page);or if you just want a number
content: counter(page);You will note however that our counter does not start on page 1 (in fact it starts on the 3rd page). To achieve this we need to allow the counter to count up, but hide it on the pages that we do not want it to be visible on, then we need to reset it and make it visible. It is a bit of a hack, but it is easier than keeping track of page numbers manually.
/* Hide the counter on pages 1 and 2 */
div.page:first-child div.subpage::after,
div.page:nth-child(2) div.subpage::after {
    display: none;
}
/* Reset the counter on the 3rd page */
div.page:nth-child(3) {
    counter-reset: page;
}
/* Increment the counter every time a new page is encountered */
div.page:not(:first-child) {
    counter-increment: page;
}We are all used to seeing linke underlined on web pages but for some it can seem an unnecessary distraction when transcribed to a PDF. Albeit subjective (as all design is) personally I like to get rid of the underline but keep the blue colour just to hint to the user that it is clickable.
To change this or any formatting specifically for pdf generation you use the @media print directive in your CSS.
@media print {
    a {
        text-decoration-line: none !important;
    }
}Chances are that if you have gone to the trouble of writing a lengthy document in HTML then you may wish to utilise it in HTML format. The problem is that you have a big blue margin around the outside of your page. You may be tempted to set the border to none however that would be ill advised as it could change the formatting. The best thing that you can do to ensure nothing changes is to leave it where it is and just make it white.
.subpage {
    border: solid white !important;
}Depending on what we are doing we use both of these setups (sometimes even both at once), but as long as you have something to preview and something to write code on you shouldn't run into difficulties.
Without doubt our favorite ide for developing anything HTML is Pulsar-edit. Along with the atom-preview-html plugin you can configure it to perform real time updates as you type, it has plugins for code snippets and when utilised along with our JavaScript plugin can be a real time saver once you get used to it.
'.text.html.basic':
    'Page and Subpage':
        'prefix': 'hpage'
        'command': 'insert-page-subpage'
        'body': '<div class="page">\n <div class="subpage">\n </div>\n</div>'
        'description': 'Insert page and subpage container'
    'Code box':
        'prefix': 'bcode'
        'command': 'insert-codebox'
        'body': '<div class="code-container">\n \t<div class="code-container-sub">\n \t<pre><code>\n </code></pre>\n \t</div>\n</div>'
'description': 'Insert code snippet container'We believe that VS Code is another solid alternative that works similarly however we haven't used it ourselves.
If you love vim then you probably don't need us to tell you how to set up your environment but in testing we have found that previewing the output with Falkon browser results in the almost real time updates on save without need to manually refresh the page refresh. While probably not the world's greatest browser for daily internet use we have found it the best solution for live previewing while using your favourite text editor (be that vim, nano, or something less hardcore) to design your pages.
The wkgtk-html2pdf library provides a professional-grade C++ interface designed for high-performance document automation. Starting with Version 1.0.0, the API utilizes the Pimpl (Pointer to Implementation) idiom, ensuring a stable Application Binary Interface (ABI). This allows the internal rendering engine to be updated without requiring the host application to be recompiled.
The wkgtk-html2pdf C++ API is designed for professional document automation where long-term binary compatibility is a requirement. To achieve this, the library adheres to two core principles:
Every public-facing class such as PDFprinter and html_tree utilises the Pointer to Implementation (Pimpl) idiom. The header files contain no private members from third-party libraries (WebKit, PoDoFo, or GLib).
The rendering engine utilizes a Singleton pattern for GTK initialization.
icGTK::init():This must be called once at the start of your application. It manages the heavy WebKit infrastructure within a dedicated thread, ensuring your main application loop remains responsive.
The html_tree class allows for programmatic construction of well-formed HTML without manual string concatenation. cpp
#include <wk2gtkpdf/ichtmltopdf++.h>

// 1. Create the Root
phtml::html_tree dom("html");

// 2. Nest Elements
phtml::html_tree *body = dom.new_node("body");
phtml::html_tree *h1   = body->new_node("h1");

// 3. Set Content (ABI-safe strings)
h1->set_node_content("Professional PDF Report");

// 4. Extract HTML string
phtml::process_nodes(&dom);
const char *html = dom.get_html();

// 5. Cleanup
phtml::PDF_FreeHTML(html);The PDFprinter class manages the conversion of HTML strings into PDF documents or raw binary data.
#include <wk2gtkpdf/ichtmltopdf++.h>

// Initialize the Global GTK Loop (Call once)
icGTK::init();

phtml::PDFprinter pdf;

// Set input HTML and Output filename
pdf.set_param(html, "report.pdf");

// Set Layout parameters
pdf.layout("A4", "portrait");

// Execute Rendering
pdf.make_pdf();
For advanced workflows (e.g., post-processing with ImageMagick), the library can return the PDF as a raw memory buffer.
pdf.set_param(html); // No filename provided = BLOB mode
     pdf.make_pdf();

     // Retrieve Binary Data
     phtml::PDF_Blob binDat = pdf.get_blob();

     // ... process binDat.data (size: binDat.size) ...

     // Explicitly free the library-allocated memory
phtml::PDF_FreeBlob(binDat);To facilitate dynamic content generation, the API includes printf-style helpers that handle internal buffering automatically.
new_node_f(const char *format, ...)
set_node_content_f(const char *format, ...)The wkgtk-html2pdf engine provides three distinct modes for generating PDF sidebar bookmarks (the document outline). This is controlled via the phtml::index_mode enumeration.
When calling the rendering methods, you must pass one of the following flags:
| Constant | Description |
|---|---|
| index_mode::OFF | Default. No sidebar bookmarks are generated. |
| iindex_mode::CLASSIC | Scrapes all <a> tags with internal # anchors.See 4.1 Classic mode |
| index_mode::ENHANCED | Only indexes elements explicitly marked with the index-item class. See 4.2 Enhanced mode |
To enable indexing within your C++ application, pass the mode as the third argument to the parameter setup function.
#include <wk2gtkpdf/ichtmltopdf++.h>

// 1. Initialise the printer
phtml::PDFprinter pdf("file:///path/to/resources/");

// 2. Set parameters with Indexing Mode
// Signature: set_param_from_file(const char* infile, const char* outfile, index_mode mode)
phtml::index_mode myMode = phtml::index_mode::ENHANCED;

pdf.set_param_from_file("input.html", "output.pdf", myMode);

// 3. Configure layout and render
pdf.layout("A4", "portrait");
pdf.make_pdf();